Cleaning & HouseholdLife Style
How to Clean & Restore a Cast Iron Skillet


Cast-iron pots and pans are often considered the gold standard because of their ability to distribute heat evenly and to consistently produce a steady stream of dishes, such as steaks and pizza.
What you need
These classic frying pans have stood the test of time. Look for dirtier, more affordable frying pans from flea markets, old attics, or family heirlooms.

Step one.
Line the bottom rack of the oven with aluminum foil. Place the pan upside down on the top rack. The foil will catch the baked goods and make cleanup easier.

Step 2.
Enable the oven cleaning setting and wait for the entire cycle to complete. If your oven does not have a self-cleaning setting, heat the oven to 425 degrees and begin checking the pan after 2 hours. When the cycle is complete, remove the pan from the oven and allow the pan to cool. It will still look rusty, but most of the deposits should be loose at this stage.

Step 3.
Soak the pan in an equal amount of water and white vinegar, finishing with a tablespoon of liquid dishwashing detergent. Allow to soak for 3 hours.

Step 4
Remove the pan and rinse it well, then wipe off any remaining dirt with a paper towel or rag until completely dry.

Step 5
Now you are ready to season the pan. Seasoning is the process of creating a non-stick surface, and if properly cared for, a seasoned coating will last a long time. Rub peanut oil all over the pan (inside, outside, and handle) to add color.

Step 6.
Place the pan upside down on the top shelf of the oven and heat at 350 degrees for 1 hour. This process opens the pores of the pan to absorb the oil and then closes them again after it cools to retain the oil. When the pan is removed from the oven, it has a classic shine and is ready to use.

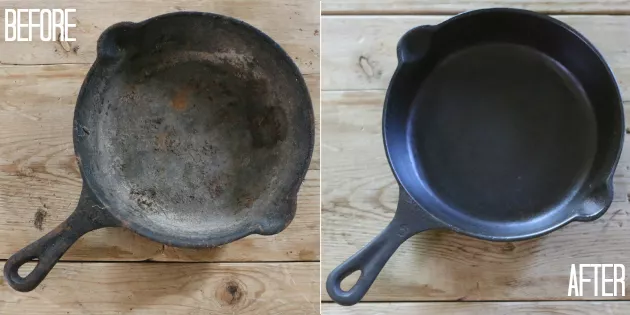
Before and After
Using this method, a pan that might otherwise end up in the trash is transformed into a beautiful, historic piece of cookware that is perfect for display. As you can see, these timeless cookers are truly priceless when properly cared for.
